How to get started?[ | ]
There are two main options.
- Open the PDA.yaml and PDA.csv file in your preferred Editor software. You can find both files in your Scenario/Extras/PDA directory. This requires very good skills in knowledge - how Yaml/CSV works and what Empyrion has to offer in terms of PDA properties. Only recommended for experienced users.
- Use third party tools to create / edit your PDA files. (scroll to the bottom and check which are available) This option is very easy and only require minor user skills. Most tools provide their own documentation how to use them.
Mission Syntax Overview[ | ]
- Each Campaign (= CHAPTER) can have (several) Missions (= TASKS).
- Each Mission can have (several) goals (= ACTIONS) that need to be fulfilled
- Rewards are given when the Chapter is completed
Example:
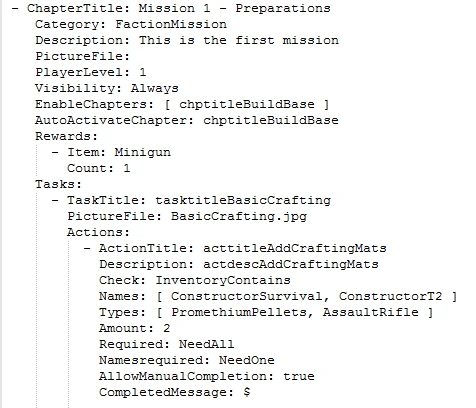
Tip: Open the PDA.yaml in the folder ../CONTENT/EXTRAS/PDA for live-examples
Mission Syntax Parameters[ | ]
Rules and Options for creating a campaign and single missions
Main: Chapter[ | ]
- ChapterTitle: A campaign always starts with the chapter title. This is the main title shown in the PDA Mission list.
- Category: FactionMission or SoloMission or Tutorial or Knowledgebase -> adds the entry to the correct tab in the PDA
- Description: Adds a description that is available in the PDA detail screen of the chapter. Becomes visible when the player clicks on the chapter headline in the PDA Mission list.
- PictureFile: Adds a picture that is visible to the player when clicking the chapter headline in the PDA Mission list. The picture needs to be available in the folder ../CONTENT/EXTRAS/PDA.
- PlayerLevel: The level a player needs to reach to be able to ACTIVATE the chapter
- Visibility: Decides WHEN this chapter is displayed/visible in the list -> Always, ByLevel (only if the player has a certain level), WhenRewarded (Shows this chapter if the previous one has been completed)
- EnableChapters: [ ] -> Default-Activates the Chapter defined in the brackets [ ] in certain circumstances. Use for example, if you want to create missions that should become only visible in the Mission List when completing a previous mission; Can be used with AutoActivateChapter.
- AutoActivateChapter: Auto-ACTIVATES the defined Chapter when the chapter with this setting is completed (checks vs. other parameters like Playerlevel, Visibility etc)
- Rewards - Item: Can be an item, device, credits, gold or XP; Rewards are automatically moved to the Player Inventory when a chapter is completed.
- Rewards - Count: Amount of items rewarded.
NOTE regarding the "Visibility: WhenRewarded" setting The order of the chapters laid down in the PDA.yaml directly decides what is the "previous chapter" and what is the "follow up chapter" that becomes visible/active when completing the previous chapter. If you want to use this visibiliy setting, you need to keep the order intact: Chapter A (initializes Campaign; Visibility: Always) -> Quest B (Visibility: WhenRewarded) -> Quest C (Visibility: WhenRewarded) and so on..
NOTE regarding REWARDS You can add any item or any amount of items as a reward, BUT you can not use a number for Reward-Count that is higher as the maximum STACK SIZE in the game! This means, the maximum number allowed here is 999 for most of the items. If you want to add items that have a lower maximum stack size like 1 (like weapons, tools or some devices) or 5 (like Pentaxid), you can only set the Reward-Count to the maximum of the item stack size. If you want to reward more of the same item with its maximum stack, just add another line with Reward-Item and maximum stack size as a Reward-Count!
Subheader: TASKS[ | ]
General:
- A chapter can have several TASKS, but needs at least ONE.
- A chapter is completed if all TASKS are completed! (no optional tasks at the moment)
- TaskTitle initializes a new task.
- TaskTitle is the headline visible above the list of actions in your HUD (on the right). It is also the first sub-header in the PDA Mission list when you expand a chapter with the dropdown arrow.
- TaskTitle has only room for up to 26 characters (including spaces)! If you add more characters, this will lead to a line break in the HUD view (which might look awful).
Options:
- Tasktitle: Add a descriptive title as a sub-header of your chapter
- PictureFile: Shown in the PDA Mission detail screen on the right. The picture needs to be availalbe in the folder ../CONTENT/EXTRAS/PDA
- Actions: (see next paragraph)
Note: The sequence of the TASKs that are added to a CHAPTER in the PDA.yaml decide the order in which they need to be run!
Todos: ACTIONS[ | ]
General:
- A TASK can have serveral ACTIONS, but needs at least ONE.
- A TASK is completed if all ACTIONS are completed (no optional ACTIONS possible at the moment)
- ActionTitles are the checkboxed TODO lists that are displayed in your HUD (on the right) below the TaskTitle (Headline in the HUD Todo List). They are also displayed on top of the individual PDA Mission detail screen when you click on a task in the PDA Mission list.
- ActionTitle has room for up to 24 characters (including Spaces)! If you add more characters, this will lead to a line break in the HUD view.
Options:
- ActionTitle: Add an action headline
- Description: Add a more detaild description, shown in the PDA Mission detail screen on the right
- Check: Initial Condition/Trigger, deciding about HOW something should happen
- Names: WHERE the CHECK Condition needs to take place = WHERE something should happen (Enity,POI,..any Device, NPC, Creature with an inventory)
- Types: WHAT the CHECK Condition is about or needs to be found/used/picked up/... (Block, Device)
- Amount: Defines how many of the defined NAMES or TYPES are needed to complete the task.
- Required: Refering to TYPES only. If more than one TYPE is possible for completing the Action, you can use NeedAll or NeedOne. Can be left out, if TYPE is only one Item.
- Namesrequired: Same like Required, but only working with NAMES. Both can be mixed in one Task/Action. Can be left out, if NAME is only one Location.
- AllowManualCompletion: true = player can click on the Action-Checkbox in the PDA detail screen for this task to complete a task. Removing this line = sets to false
- Complete Message: The dollar sign generates a default message like "You successfully completed '<ActionTitle>'". If you want to read a customized message, swap the $ with your message.
Note:
- You can only use ONE CHECK option with each ACTION.
- At least one NAMES or TYPES is needed to create an ACTION.
- NAMES and TYPES can hold one or several values. Muti-values are added in brackets [ ]. See the PDA.yaml missions for examples on how to do that.
- Complete Message is needed to run a mission (either with $ or with a custom message)
- All other options are optional! ( Amount, Required, Namesrequired, AllowManualCompletion)
Localization[ | ]
If you want to use localized missions (English and German), you need to use abbreviations for all titles and descriptions and add your loca to the PDA.csv refering to these abbreviations
CHECK, NAMES, TYPES (examples)[ | ]
CHECK[ | ]
Note: some of the CHECKs currently can either be used with NAMES and TYPES or only with one of them.
- BlocksPlaced = Names (where to place the block) Types (which block to be placed))
- BlocksRemoved = Names (where to place the block) Types (which block to be placed))
- BlockDestroyed = Names (where to place the block) Types (which block to be placed))
- ConstructionQueueContains = Names (which Constructor), Types (Contains which template)
- DevicePowered = Types (which device)
- InventoryOpened = Names (Inventory of which device; also for NPC/Animal)
- InventoryEmptied = Names (Inventory of which device; also for NPC/Animal)
- InventoryContains = Names (which Inventory; PLAYER not possible), Types (Contains what); Worksonly with Survival Constructor at the moment
- ItemsPickedUp = Types (which items;only plants/ore; won't work for picking up weapons or dropped bags)
- ItemsConsumed = Types (No NAMES)
- ItemsCrafted = Types (which block/device)
- ItemsUnlocked = Types (No NAMES)
- Signal = Signal Name (use the Asterix * for your Signal names in your POI blueprints, if you want to make use of it in your PDA)
- SubjectKilled = Names (which NPC/Animal; No TYPES)
- StructureSpawned = Names (which structure/starterblock)
- ToolbarContains = Type (no NAMES)
- MainPowerSwitched = Names (Base)
- NearResource = Types (Which resource); no NAMES (Near = below 100m)
- NearPoi = Names (Which POI) (Near = below 100m)
- ResourceDiscovered = Names (no TYPE)
- PoiDiscovered = Types (no NAMES)
NAMES[ | ]
- entity classes: BASE, HV, SV, CV (also completes when spawning blueprints)
- Fauna-names (list TBA)
- NPC-Names (list TBA)
- POI Names (list TBA)
- Most things with an inventory like (Note: Not all of the CHECK Triggers work with all of the NAMES right now; Have a look at the current PDA.yaml to see a range of combinations that work)
TYPES[ | ]
Have a look in the first column of the Localization.csv All the Item-Names that are usable are listed there! ...\Steam\steamapps\common\Empyrion - Galactic Survival\Content\Extras
Questions[ | ]
Q: What is the difference between NearPoi vs PoiDiscovered?
A: Relevant only for missions run on a server. NEAR = every player on the server can run this mission. DISCOVERED = only the first player on a server can complete this mission, as he discovers a location for all other players (may be changed in the future)
Q: Is it possible to have more than one reward?
A: Of course. Just add another Item/Count pair. Have a look into the PDA.yaml Missions for examples.
Related links[ | ]
https://empyriononline.com/threads/tool-ewpda-empyrion-web-pda-v1-5-3.82979/ - eWPDA, Empyrion Web PDA. Third party tool to make editing and creating PDA missions easier.