Want to customize your solar system? Read on here: Customizing Solar Systems
How to start the dedicated server
Go to the folder: C:\Program Files\Steam\SteamApps\common\Empyrion - Galactic Survival (if Steam is not installed to standard location, see: https://support.steampowered.com/kb_article.php?ref=7418-YUBN-8129)
- To start a dedicated server with rudimentary GUI: "EmpyrionDedicated.cmd"
- To start a dedicated server without GUI: "EmpyrionDedicated_NoGraphics.cmd"
To run the server when your computer starts and you log in, create a shortcut to the .cmd file of your choosing and place that shortcut in the folder: %appdata%\Microsoft\Windows\Start Menu\Programs\Startup. Remember to enter the command saveandexit 0 before shutting down or logging off, or you may lose your progress!
How to configure your server
Servers can be configured via changing the value of the property in "dedicated.yaml" in ..\Steam\SteamApps\common\Empyrion - Galactic Survival\ folder.
Each property can be disabled by putting '#' in front of the line. To enable a property, remove the #
| Available Props | ||
|---|---|---|
| Props | Value | Description |
| Srv_Port | Numeric | Default is 30000. If your are using a router and/or a firewall, you need to forward the ports 30000-30004 UDP and TCP. Please search the web on how this can be achieved for your router and firewall, as the setup process is different for each model/version! |
| Srv_Name | alphanumeric | name that will be shown in the Server Browser |
| Srv_Password | Alphanumeric | password to make server password protected |
| Srv_MaxPlayers | Numeric | maximum number of player allowed to join simultaneously in the server. |
| Srv_ReservePlayfields | Alphanumeric | Determines the number of playfield servers that are held in reserve. For busy public servers, we recommend at least 2 (default is 1) |
| Srv_Description | Alphanumeric | Server info between the " ", can contain [b]bold[/b] text or a [u][url=empyriongame.com]link[/url][/u] up to 127 chars. |
| Srv_StopPeriod | Numeric | All playfield servers will be automatically stopped every <n> real time hours. Players will get some warning messages before |
| Tel_Enabled | True/False | enable/disable Telnet |
| Tel_Port | Numeric | Telnet port |
| EACActive | True/False | ANTICHEAT NOT YET AVAILABLE -> Planned feature. Do NOT activate by now. Could cause unwanted effects! |
| SaveDirectory | Alphanumeric | Defines where your server saves the server-game world |
| Tel_Pwd | Alphanumeric | Telnet password |
| GameName | Alphanumeric without space | this is the name of the save game created in the save game folder |
| Mode | 2=Creative, 1=Survival | Creative/Survival world |
| Seed | Numeric without 0 or negative | Seed determines how the world is procedurally generated - the same seed means the same world. Can be any 7 digit or below number but negative numbers and 0 (zero) cannot be used. |
| DecayTime | Numeric | Time in real time hours when player-built structures without core and/or less than 10 blocks get removed. 24h in game = ca 1h real time |
| WipeTime | Numeric | 0 = disabled. Time in realtime. 24h in game = ca 1h real time |
| ProtectTime | Numeric | 0 = disabled. Time during which structures are offline protected. Time in real time. 24h in game = ca 1h real time |
| MaxStructures | Numeric | Set this if you want to limit max number of structures per playfield due to performance. Currently, max number must not exceed 100 |
| AntiGriefDistance | Numeric | For PvE playfields: distance (in m) around a faction's base where no other faction's base can be built |
Default Configuration (Example)
ServerConfig:
Srv_Port: 30000
Srv_Name: My Server
# Srv_Password: Abc
# Srv_MaxPlayers: 8
# Srv_ReservePlayfields: 2
# Srv_Description: "Server info, can contain [b]bold[/b] text or a [u][url=empyriongame.com]link[/url][/u]."
# Srv_StopPeriod: 48
# Tel_Enabled: true
# Tel_Port: 30004
# Tel_Pwd: Abc
# EACActive: false
# SaveDirectory: Saves

GameConfig:
GameName: New Game
Mode: Survival
Seed: 2309115
DecayTime: 2
WipeTime: 0
ProtectTime: 48
MaxStructures: 64
AntiGriefDistance: 30
How to connect to the server console
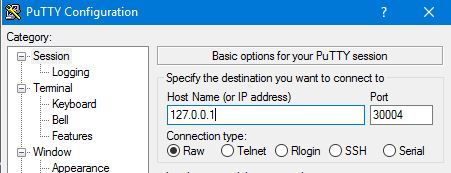
Telnet
Use the PuTTY terminal emulator to access your server, if telnet is enabled in the server configuration. The default port is 30004. Be advised that, while the service uses telnet, the Raw connection type should be used. Use of the Telnet connection type causes unusual issues, such as the initial input of the password will always fail.
Server and Console commands
All of the following commands are available via Telnet and from the in-game CONSOLE to Gamemasters, Moderators and Server Admins. Where <steam-id> is listed in the following command syntax, enter either a player's Steam ID # or their player name. If the player name contains spaces, encapsulate the player's name in single quotes; e.g.: 'Player Name'
| Available Commands | ||
|---|---|---|
| Command | Syntax | Description |
| help | help | Shows all of the available commands. Additionally, by prefixing a command with help, all of the options for that command will displa;. e.g.: "help faction" |
| ban | ban <steam-id> <duration> | Ban a player for an amount of time.
The duration can be given in hours, days or months, e.g. '2h' Example: "ban 1234567890 14d" - will ban the player for two weeks |
| faction | faction <function> | There are several faction functions for managing player factions:
Note: Put faction name and playerid in single quotes if it contains spaces |
| gents | gents | List all structures on all playfields, the faction that owns it, whether or not it is a spawn point, and the structure's name. (only dedi/server) |
| initadmin | initadmin | Sets oneself as the initial administrator. This command can only be executed if there is no player
with admin permissions. |
| kick | kick <player> [message] | Kick player (or all players) out of game, optionally with a message.
|
| list | list perm
list ban |
Lists players with special permissions or banned players.
|
| plys | plys | Shows all players in the game |
| saveandexit | saveandexit <timeout in minutes: max=15> | Saves the game and shuts down the server after a given timeout.
Example: saveandexit 10 NOTE: Issuing this command automatically cancels a scheduled 'stoppf' command! When using a timeout some warning messages will be broadcasted before actual exiting. |
| say | say 'text with spaces' | Sends a chat message to all players. |
| servers | servers or svs | Either command lists all connected playfield severs |
| setrole | setrole <steam-id> <role> | Sets the role for a player, giving them special permissions.
Elevated players can, for example, execute privileged console commands.
Example: setrole 1234567890 gm |
| stoppf | stoppf <playfield> <function> | Stops a specific playfield or all playfield servers - optionally after a given timeout.
Functions:
Examples: stoppf Ningues |
| time | time [time value] | Get / set the global server time [can only be executed on servers]
|
| unban | unban <steam-id> | Using a player-name as parameter requires the player to be in the game, using the steam-id is always possible. |
FAQ / Q&A
Have additional starter planets
- Stop your server
- Open the sectors.yaml
- Find the planet you would like to offer as a starter planet
- Add TRUE to the planets entry
Example
- Coordinates: [ 20, 0, -15 ]
  Playfields:
  - [ "0, 0, 0", "Omicron Orbit", SpaceAsteroidFieldOmicron ]
  - [ "-1200, 0, 7200", Omicron, Desert, true ]
  - [ "1500, 4000, -6500", Omicron Moon, Moon ]
Adding new starter planet choices will allow new players to not only have a choice at all, but also to avoid crowded starter planets like Akua. This only applies to NEW players on your server! Using FRESH START won't let the users change their starter planet.
Important: Not all planets are suitable for being used as a starter planet. To offer an easy start, you may want to adjust the playfield settings of an entirely new starter planet. Please refer to our Customizing_Solar_Systems Guide for more details!
Avoid dedicated.yaml to be overwritten
Q: My dedicated.yaml gets overwritten with each version update! What can i do?
A:
- 1. Copy your dedicated.yaml and rename it to myserver_dedicated.yaml (or "whateveryoulike_dedicated.yaml")
- 2. Open the EmpyrionDedicated.cmd (or EmpyrionDedicated_NoGraphics.cmd if you are used to start your server without GUI) with a text-tool, like Notepad++ or Windows Editor (DO NOT USE WORD or anything similar!)
- 3. Find the line that says
start EmpyrionDedicated.exe -force-d3d9 -logFile Logs\Dedicated_%UDT%.log or
start EmpyrionDedicated.exe -batchmode -nographics -logFile Logs\Dedicated_%UDT%.log
- 4. Add the parameter "-dedicated "myserver_dedicated.yaml" so it looks like this
start EmpyrionDedicated.exe -force-d3d9 -logFile Logs\Dedicated_%UDT%.log -dedicated "myserver_dedicated.yaml" or
start EmpyrionDedicated.exe -batchmode -nographics -logFile Logs\Dedicated_%UDT%.log -dedicated "myserver_dedicated.yaml"
- 5. Use SAVE AS and rename your EmpyrionDedicated.cmd, like "EmpyrionDedicated-myserver.cmd". This will avoid that the server start batch (.cmd) gets overwritten with the next version update!
- 6. Start your server with your EmpyrionDedicated-myserver.cmd. From now on, you will start your server via your own file!
Retrieving lost ships
(Workaround should also work for SP)
Retrieving lost ships can be achieved with a small workaround: Every ship ("entity") is saved in a distinct folder in your (singleplayer or) server world savegame D:\Steam\SteamApps\common\Empyrion - Galactic Survival\Saves\Games\<game name>\Shared
<game name> is the name of the save-game,
---For multiplayer this is set in the GameName prop of dedicated.yaml. The of default value is 'New Game': - { prop: GameName, value: New Game }  (The folder can only accessed by the server hosts)
---For single player it is the name of the game used at the time of starting the new game or at the time of renaming the save game at resume menu.
In the SHARED folder, you can find entries like SV_New_74922. Each of these entries has - as all windows folders have - a creation date.
If you can identify the folder of the ship that got LOST (f.ex. by asking the user when he created it), you/your player only needs to lay down a new starter block (SV for a SV and so on) and YOU, as the admin, just need to copy the four *.area files from the lost ships folder to the newly layed down starter block ship folder (overwrite!).
Steps to follow:
- Player places a new starter block (SV for SV, CV for CV ..)
- Save and Exit your server (or your game if SP)
- Copy the .area files from the lost-ships folder over to the newly created ship folder and hit yes if asked to overwrite
- Start your server (game)
Please do NOT do this while server/game is still running, as this may cause severe issues with the playfield! Of course you need FTP access to the installation folder at your hoster if you are not the host.
More Questions
Q: Is it possible to add more planets to a multiplayer world?
A: YES! You can add as many as you like. See Customizing Solar Systems for more details
Q: My server is not visible in the server browser. What can i do?
A1: Try to forward the port range (30000-30004) both with TCP and UPD
A2: For some routers, you need to specify the Port-forwarding for the PC where you run your server!
A3: If nothing helps, please try port forwarding 26900-26904 instead of 30000-30004 and/or try to run the server with antivirus and firewall turned off. You might need to seach the web on how "port forwarding" is set up correctly with your firewall and/or router!