HummeloWar (talk | contribs) m (typoe) |
m (Dragomir7 moved page Blueprints and Steam Workshop to Guide/Blueprints without leaving a redirect: Categorize) |
||
| (13 intermediate revisions by 10 users not shown) | |||
| Line 2: | Line 2: | ||
==Managing Blueprints== |
==Managing Blueprints== |
||
===Blueprint Library Overview=== |
===Blueprint Library Overview=== |
||
| − | Hit |
+ | * [[Hit]] <references />F2 (default) to open the blueprint library. The blueprint library lists all of your own, stock and aquired blueprints. |
| ⚫ | |||
| − | |||
| ⚫ | |||
Info panels (from left to right) |
Info panels (from left to right) |
||
* Type: Each blueprint has a symbol of its class added in front of the name: CV, HV, SV or Base. |
* Type: Each blueprint has a symbol of its class added in front of the name: CV, HV, SV or Base. |
||
| − | * Src: This is the source from where you aquired the blueprint. The "human" styled symbol displays that this is a blueprint created by you. A "wrench" shows this is a blueprint aquired from the Steam Workshop. A "Simcard" symbol shows these are stock blueprints (added by the developers). A |
+ | * Src: This is the source from where you aquired the blueprint. The "human" styled symbol displays that this is a blueprint created by you. A "wrench" shows this is a blueprint aquired from the Steam Workshop. A "Simcard" symbol shows these are stock blueprints (added by the developers). A small raised "wrench" next to one of the SRC-symbols tells you, this is one of your blueprints published on the Steam Workshop. |
* Resources/Time: This gives you an overview of the materials you will need to complete the blueprint and the time production will take. |
* Resources/Time: This gives you an overview of the materials you will need to complete the blueprint and the time production will take. |
||
| − | * Infos: Gives you details about the size, name, block-count and the overall player level you need to produce this blueprint. If the level is displayed in RED, you need to advance your player progression! ( |
+ | * Infos: Gives you details about the size, name, block-count and the overall player level you need to produce this blueprint. If the level is displayed in RED, you need to advance your player progression! (Press TAB to check your player level at any time) |
Additional functions: |
Additional functions: |
||
| Line 24: | Line 23: | ||
*Build a base or vessel (Survival, Creative Mode or Multiplayer Server) |
*Build a base or vessel (Survival, Creative Mode or Multiplayer Server) |
||
*Stand in front of your creation and aim at it (Your crosshair needs to point at a block of your vessel/base) |
*Stand in front of your creation and aim at it (Your crosshair needs to point at a block of your vessel/base) |
||
| − | * |
+ | *Press right ALT + O |
*Use SAVE AS, add a name and hit save |
*Use SAVE AS, add a name and hit save |
||
| − | Your blueprint is now shown in the blueprint library list on the left side of the menu. |
+ | Your blueprint is now shown in the blueprint library list on the left side of the menu. |
===Add a Steam workshop blueprints to your game=== |
===Add a Steam workshop blueprints to your game=== |
||
| Line 32: | Line 31: | ||
*Browse the Empyrion Galactic Survival Steam Workshop folder (http://steamcommunity.com/app/383120/workshop/) |
*Browse the Empyrion Galactic Survival Steam Workshop folder (http://steamcommunity.com/app/383120/workshop/) |
||
*Use the subscribe button from the overview or the detail-page of any creation you would like to use in your game. |
*Use the subscribe button from the overview or the detail-page of any creation you would like to use in your game. |
||
| − | *Resume your game and open the blueprint library to make use of them (Learn how to build and place the blueprint in the next topic!) |
+ | *Resume your game and open the blueprint library to make use of them (Learn how to build and place the blueprint in the next topic!) |
===Building and placing a blueprint=== |
===Building and placing a blueprint=== |
||
| − | Open your blueprint library ( |
+ | Open your blueprint library (F2), Click a blueprint from the list and click TO FACTORY (bottom right). You will be switched to the FACTORY tab |
*Add any resource that is listed on the Resources/Time panel. NOTE: You can NOT regain resources that were added to the factory intake yet. They are stored for future use, though. |
*Add any resource that is listed on the Resources/Time panel. NOTE: You can NOT regain resources that were added to the factory intake yet. They are stored for future use, though. |
||
| − | * |
+ | *Select START PRODUCTION. |
You may close the factory tab. When your blueprint is ready, a message will show up on the top right info screen. |
You may close the factory tab. When your blueprint is ready, a message will show up on the top right info screen. |
||
| − | *When your blueprint is ready, open the blueprint library again ( |
+ | *When your blueprint is ready, open the blueprint library again (F2) |
*Your produced blueprint is now shown on the top of the blueprint list and has a small upfacing arrow-symbol in front of it. |
*Your produced blueprint is now shown on the top of the blueprint list and has a small upfacing arrow-symbol in front of it. |
||
*Select your blueprint and use the SPAWN button (bottom right panel) |
*Select your blueprint and use the SPAWN button (bottom right panel) |
||
| Line 45: | Line 44: | ||
Tips: |
Tips: |
||
| − | *You can add ANY block to the factory intake, except ores. Refined blocks will be broken down to their ingot-level. |
+ | <nowiki>*</nowiki>You can add ANY block to the factory intake, except ores. Refined blocks will be broken down to their ingot-level. |
| − | *Adding refined blocks like hull blocks or devices will REDUCE the production time needed! Their production time (Advanced Constructor) is |
+ | <nowiki>*</nowiki>Adding refined blocks like hull blocks or devices will REDUCE the production time needed! Their production time (Advanced Constructor) is subtracted from the total blueprint production time. This way, you can nearly reduce the timer to zero! |
==Steam Workshop== |
==Steam Workshop== |
||
===Publish and update a blueprint (In-Game)=== |
===Publish and update a blueprint (In-Game)=== |
||
If you created a blueprint in-game, you may also want to publish it to the steam workshop. |
If you created a blueprint in-game, you may also want to publish it to the steam workshop. |
||
| − | *Open your blueprint library ( |
+ | *Open your blueprint library (F2) and select a blueprint |
*Click the PUBLISH button, check the visibility setting and hit PUBLISH. |
*Click the PUBLISH button, check the visibility setting and hit PUBLISH. |
||
| − | Your published blueprint will get a small raised "wrench" |
+ | Your published blueprint will get a small raised "wrench" next to its SRC icon in the blueprint library list. |
If you made in-game changes to your already published blueprint and you would like to have these changes reflected in your blueprint available in the Steam Workshop, follow these steps: |
If you made in-game changes to your already published blueprint and you would like to have these changes reflected in your blueprint available in the Steam Workshop, follow these steps: |
||
| Line 59: | Line 58: | ||
*Hit "UPDATE" and set the visibility settings accordingly |
*Hit "UPDATE" and set the visibility settings accordingly |
||
| − | Either way: The game will display a notification on the top right when the upload (publish or |
+ | Either way: The game will display a notification on the top right when the upload (publish or update) is done. |
Technical note: Publishing a new blueprint and updating will take a short amount of time to get recognized and processed by steam and the game vice-versa. The UPDATE button for this blueprint and the PUBLISH button for any other blueprint will be greyed out until this process has finished. |
Technical note: Publishing a new blueprint and updating will take a short amount of time to get recognized and processed by steam and the game vice-versa. The UPDATE button for this blueprint and the PUBLISH button for any other blueprint will be greyed out until this process has finished. |
||
| Line 77: | Line 76: | ||
*Overwrite the existing yourBlueprint.jpg with your newly created yourBlueprint.jpg (both names need to match exactly!) |
*Overwrite the existing yourBlueprint.jpg with your newly created yourBlueprint.jpg (both names need to match exactly!) |
||
*Start the game and resume a savegame or join a server |
*Start the game and resume a savegame or join a server |
||
| − | *Hit |
+ | *Hit F2, find *yourBlueprint" in the blueprint library list and hit UPDATE (If Update is not clickable, wait 10-15 seconds. Steam/Game communication takes some time!) |
Go to your workshop and voilà, the thumbnail should be visible! |
Go to your workshop and voilà, the thumbnail should be visible! |
||
| Line 87: | Line 86: | ||
It is not possible to delete a the Steam Workshop entry from withing the game! If you hit "delete" in your in-game blueprint library, this only removes the blueprint from your PC, but not the Steam Workshop entry. |
It is not possible to delete a the Steam Workshop entry from withing the game! If you hit "delete" in your in-game blueprint library, this only removes the blueprint from your PC, but not the Steam Workshop entry. |
||
| − | Technical note: When you deleted the blueprint from the steam workshop, this will take a few minutes to get recognized and processed by steam and the game vice-versa. Unless this is completed, the in-game blueprint library will still show the small raised "wrench" |
+ | Technical note: When you deleted the blueprint from the steam workshop, this will take a few minutes to get recognized and processed by steam and the game vice-versa. Unless this is completed, the in-game blueprint library will still show the small raised "wrench" next to the blueprints SRC-icon and the "Update" button will still be available. If steam & the game updated the status of this entry, the small raised wrench-symbol will vanish and the UPDATE button will revert back to PUBLISH. |
[[Category:Guides]] |
[[Category:Guides]] |
||
| + | [[Category: Modding]] |
||
Latest revision as of 10:27, 4 July 2023
Note: All the described functions are available from any Survival- or Creative Singleplayer as well as on any Dedicated Server (Multiplayer)
Managing Blueprints[ | ]
Blueprint Library Overview[ | ]
- Hit F2 (default) to open the blueprint library. The blueprint library lists all of your own, stock and aquired blueprints.
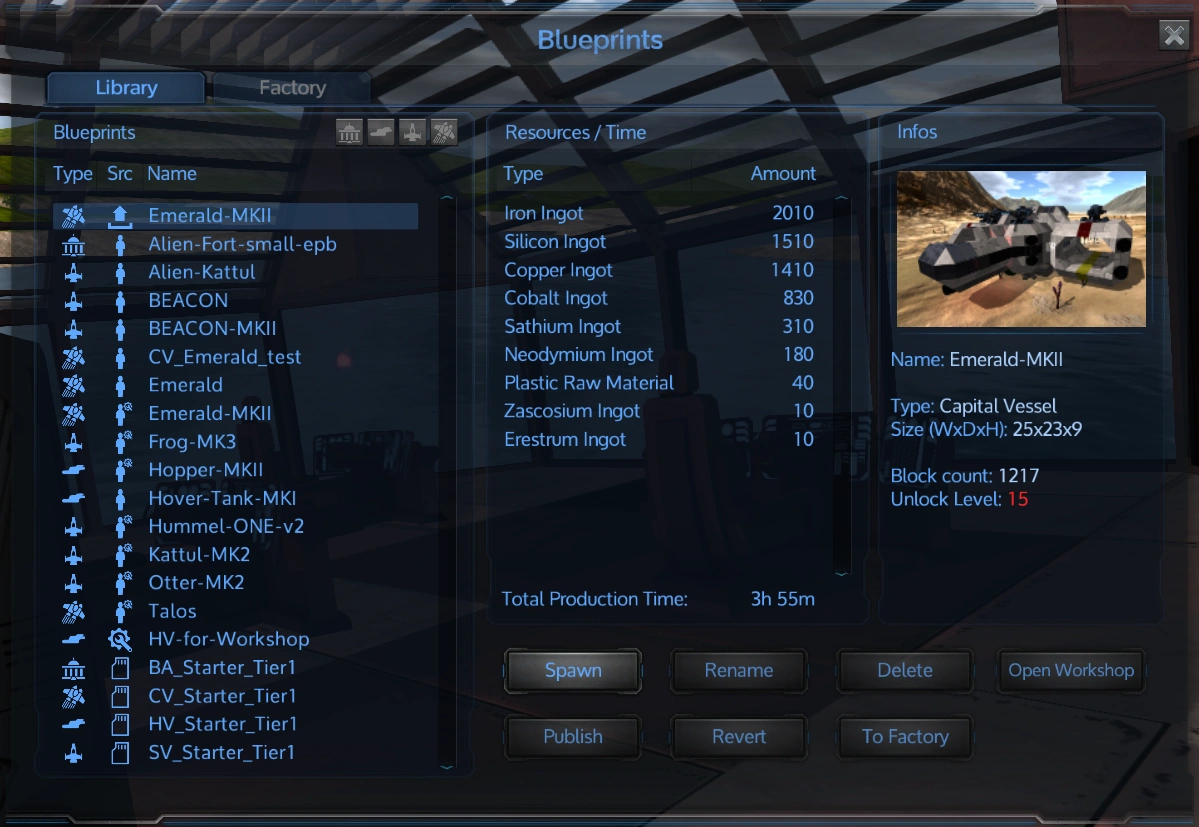
Info panels (from left to right)
- Type: Each blueprint has a symbol of its class added in front of the name: CV, HV, SV or Base.
- Src: This is the source from where you aquired the blueprint. The "human" styled symbol displays that this is a blueprint created by you. A "wrench" shows this is a blueprint aquired from the Steam Workshop. A "Simcard" symbol shows these are stock blueprints (added by the developers). A small raised "wrench" next to one of the SRC-symbols tells you, this is one of your blueprints published on the Steam Workshop.
- Resources/Time: This gives you an overview of the materials you will need to complete the blueprint and the time production will take.
- Infos: Gives you details about the size, name, block-count and the overall player level you need to produce this blueprint. If the level is displayed in RED, you need to advance your player progression! (Press TAB to check your player level at any time)
Additional functions:
- If you want to update an already existing blueprint, follow the steps again and use OVERWRITE instead of Save As.
- Use RENAME if you just want to rename your blueprint
- Delete will remove the blueprint from the blueprint library list for any game you play, but NOT from the Steam Workshop (if published previously)
- OPEN WORKSHOP = not yet functional
- PUBLISH will publish the selected blueprint to the Steam Workshop. This will turn into UPDATE if you have selected a blueprint that has already been published.
- REVERT = not yet functional
- TO FACTORY = will start the blueprint-production in the FACTORY tab (see topics below)
Create and update a blueprint[ | ]
- Build a base or vessel (Survival, Creative Mode or Multiplayer Server)
- Stand in front of your creation and aim at it (Your crosshair needs to point at a block of your vessel/base)
- Press right ALT + O
- Use SAVE AS, add a name and hit save
Your blueprint is now shown in the blueprint library list on the left side of the menu.
Add a Steam workshop blueprints to your game[ | ]
If you want to add a blueprint from the Steam Workshop to your game...
- Browse the Empyrion Galactic Survival Steam Workshop folder (http://steamcommunity.com/app/383120/workshop/)
- Use the subscribe button from the overview or the detail-page of any creation you would like to use in your game.
- Resume your game and open the blueprint library to make use of them (Learn how to build and place the blueprint in the next topic!)
Building and placing a blueprint[ | ]
Open your blueprint library (F2), Click a blueprint from the list and click TO FACTORY (bottom right). You will be switched to the FACTORY tab
- Add any resource that is listed on the Resources/Time panel. NOTE: You can NOT regain resources that were added to the factory intake yet. They are stored for future use, though.
- Select START PRODUCTION.
You may close the factory tab. When your blueprint is ready, a message will show up on the top right info screen.
- When your blueprint is ready, open the blueprint library again (F2)
- Your produced blueprint is now shown on the top of the blueprint list and has a small upfacing arrow-symbol in front of it.
- Select your blueprint and use the SPAWN button (bottom right panel)
- You will now see a blue or red wireframe displayed in front of you. Blue = free to place, Red = not possible (for Bases you may need to flatten the area first!)
Tips:
*You can add ANY block to the factory intake, except ores. Refined blocks will be broken down to their ingot-level.
*Adding refined blocks like hull blocks or devices will REDUCE the production time needed! Their production time (Advanced Constructor) is subtracted from the total blueprint production time. This way, you can nearly reduce the timer to zero!
Steam Workshop[ | ]
Publish and update a blueprint (In-Game)[ | ]
If you created a blueprint in-game, you may also want to publish it to the steam workshop.
- Open your blueprint library (F2) and select a blueprint
- Click the PUBLISH button, check the visibility setting and hit PUBLISH.
Your published blueprint will get a small raised "wrench" next to its SRC icon in the blueprint library list.
If you made in-game changes to your already published blueprint and you would like to have these changes reflected in your blueprint available in the Steam Workshop, follow these steps:
- Open your library and select the blueprint you want to update for the Steam Workshop
- Hit "UPDATE" and set the visibility settings accordingly
Either way: The game will display a notification on the top right when the upload (publish or update) is done.
Technical note: Publishing a new blueprint and updating will take a short amount of time to get recognized and processed by steam and the game vice-versa. The UPDATE button for this blueprint and the PUBLISH button for any other blueprint will be greyed out until this process has finished.
Adding Infos and Pictures (Steam Workshop)[ | ]
Publishing a blueprint from within the game will only add basic details, like a thumbnail and the name of the blueprint. It's strongly recommended you take manual action on your entry in the Steam Workshop to spice it up.
- Open your Steam Workshop folder: http://steamcommunity.com/id/*yourSteamLoginName*/myworkshopfiles/
- Click on your submission to open the detail page
From there, you can change various settings, add descriptions and more pictures or change the visiblity (Public, Friends, Private).
Change Promoted Thumbnail/Preview (Steam Workshop)[ | ]
If you want to change the Promoted Thumbnail of your blueprint in the steam workshop (or if your entry is missing a thumbnail at all), please follow these steps:
- Make a nice screenshot of your vessel or base (F12 or F7)
- Crop to 800px*450px (wide*height)
- Save your file as yourBlueprint.jpg (exchange yourBlueprint with the exact(!) name of your blueprint)
- Open the blueprint folder: ....\Steam\steamapps\common\Empyrion - Galactic Survival\Saves\Blueprints\*yoursteamID*\*yourBlueprint*
- Overwrite the existing yourBlueprint.jpg with your newly created yourBlueprint.jpg (both names need to match exactly!)
- Start the game and resume a savegame or join a server
- Hit F2, find *yourBlueprint" in the blueprint library list and hit UPDATE (If Update is not clickable, wait 10-15 seconds. Steam/Game communication takes some time!)
Go to your workshop and voilà, the thumbnail should be visible!
This is also the recommended way of changing the default-thumbnails that are taken automatically when you create an in-game blueprint the first time.
Deleting a published blueprint (Steam Workshop)[ | ]
If you want to remove one of your blueprints from the Steam workshops, open the detail page of your entry in the workshop and use the "DELETE" button.
It is not possible to delete a the Steam Workshop entry from withing the game! If you hit "delete" in your in-game blueprint library, this only removes the blueprint from your PC, but not the Steam Workshop entry.
Technical note: When you deleted the blueprint from the steam workshop, this will take a few minutes to get recognized and processed by steam and the game vice-versa. Unless this is completed, the in-game blueprint library will still show the small raised "wrench" next to the blueprints SRC-icon and the "Update" button will still be available. If steam & the game updated the status of this entry, the small raised wrench-symbol will vanish and the UPDATE button will revert back to PUBLISH.